My Work
The  My Work feature in RigFlow helps users track, manage, and perform tasks specific to their job role on the rig. It centralizes ongoing, upcoming, and backlog tasks, and allows users to track, update, and add activities directly from the application.
How it looks
My Work is located on the Right sidebar of RigFlow, and it is organized into the following sections:
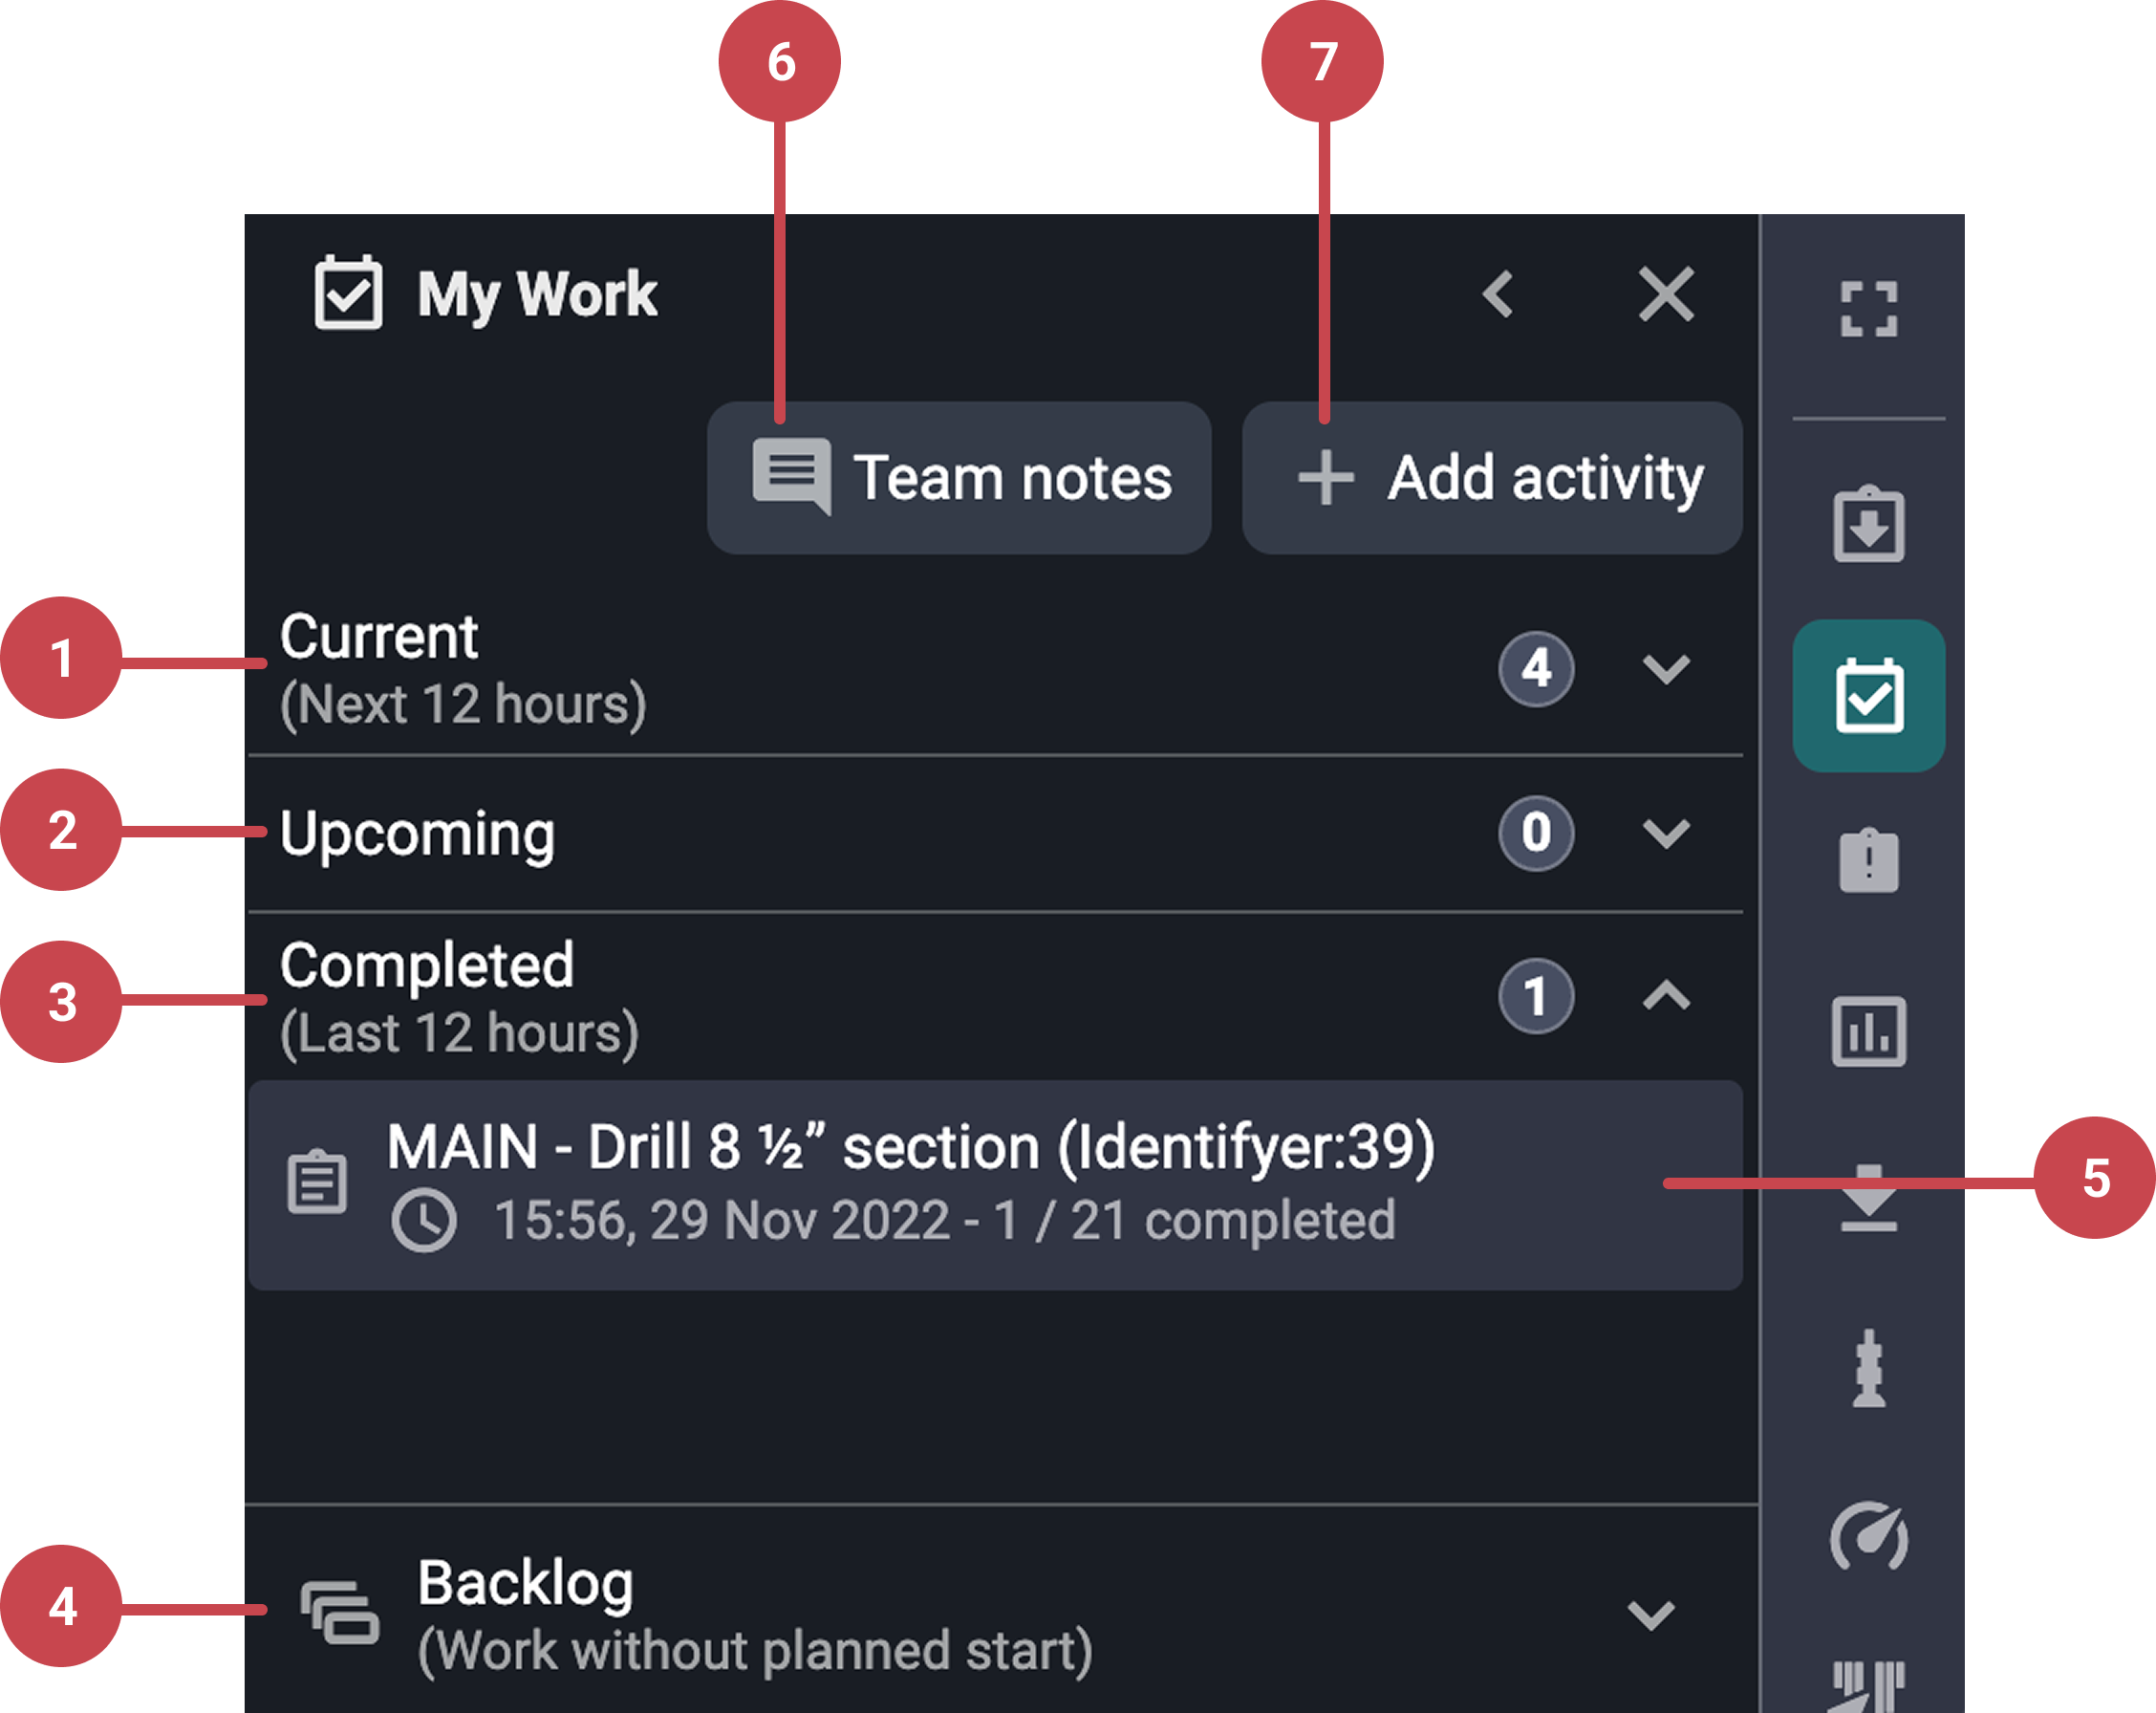
Current: This expandable section shows all work that is planned for the next 12 hours.
Upcoming: Contains tasks that are scheduled beyond the next 12 hour window.
Completed: Displays activities that were completed within the last 12 hours. Items remain in this section temporarily before being removed automatically after 12 hours.
 Backlog: Lists all work items that do not have a planned start time.
Work item cards: Work items in My Work appear as cards within each section. These cards represent different types of tasks assigned to the user:
Activity cards: Standalone tasks assigned to a job role. These are independent of a plan and managed directly through RigPlan.
Plan-related item cards: Tasks linked to a plan step, such as Preparations or Report Backs. These cards are marked with an
 icon and a completion counter.
Procedure cards: Represent procedures assigned to the user’s job role. Clicking the card opens the procedure details modal, where the user can view operation steps, information, and attachments.
 Team notes: Allows users to log a summary or comment for a specific day that is visible to the whole team.
 Add activity: Enables users to manually log their own activities, especially for unassigned or spontaneous tasks.
Step-by-step instructions
Navigate My Work
Access My Work: Navigate to the Right sidebar on RigFlow and click on the
My Work icon.Understand the layout: My Work is divided into four collapsible sections with a badge counter indicating the number of items inside:
Current: Tasks scheduled for the next 12 hours.
Upcoming: Tasks planned beyond the next 12 hours.
Completed: Tasks completed in the last 12 hours.
Backlog: Tasks without a planned start time.
Expand and collapse content: Click the arrows on each section or item to
 expand or
  collapse.
Work with activities
Open the activity details modal: Click any activity card to open its details modal.
Review details: View details like title, start time, assigned team, responsible job role, participants, and structured content.
Manage participants: Click the participants dropdown in the modal, then use the Add other role menu to select and add job roles, or remove participants by clicking the
 Remove icon next to their name.
Upload file and add comments: In the modal, click the
 Upload button to attach files, use the comment bar to write a comment, and set a timestamp using the time selector.
Resume, pause, or complete the activity: In the Current section, pause or complete an activity using the buttons at the bottom of the Activity Details modal; in the Upcoming and Backlog sections, click to resume activities when ready.
Use plan related items
Identify a plan related work: Plan work cards are marked with a
Plan icon and completion counter. They show the plan title and a summary of tasks assigned to the user.View the task types: Click the card to open the plan-related work modal. Task displayed might include preparations, report backs, and parallel activities.
Take action: For preparations, users can check off items once complete. For report backs, users can submit their response directly in the modal.
Work with procedures
View a procedure: Click the procedure card to open a modal with
 operation,
  information, and
  attachment tabs. It also includes a header with a status indicator and a participant icon.
Manage the procedure status: Click the status indicator dropdown to view the current status and choose to start, abandon, or complete the procedure.
Complete steps: Steps can be completed individually, and users can track the progress within the
Operation tab. The procedure will remain running until you manually mark it as complete, even if all steps are finished.Complete a procedure: After starting a procedure, the only option in the status dropdown is Complete Procedure, which you must select manually when the procedure is finished.
Download the procedure: Click the
 Download as PDF button, then choose whether to include attachments and select the desired text size.
Add an activity
Access the add activity panel: Click the
Add activity button.Enter the activity information: Once you click the
Add activity button, a modal will open requesting information regarding the activity you want to enter.Add the activity: Click the Start button. The new activity will be added to the Current section and appear as already started.
Add a team note
Open the team notes modal: Click on the
 Team notes button on the My Work panel.
Fill the fields: Enter the comment on the text field, ajust its timeframe from the
 Now button, and select a team from the dropdown.
Add a team note: The note will appear at the top of the day's section in RigPlan, making it easy for the team to see.
Examples
A mechanic on the rig logs into My Work from a mobile device, starts a “Check Hydraulic Pressure” activity, uploads a photo, and completes it. They then add a team note summarizing the day’s progress.
Tips and tricks
Regular Updates: Keep your tasks updated with the latest information to ensure accuracy.
Clear Assignments: Clearly assign tasks to avoid confusion and ensure accountability.
Frequent Reviews: Regularly review your task list to prioritize and manage deadlines effectively.
Check the Backlog: Tasks with no start time live there, don’t overlook it.