Table view for planning
The Table View in WellNav displays key depth-based entries, such as surveys, geological risks, and events added by the rig team. It gives the crew a quick overview of what to be aware of in the well before or during plan execution. Like a simplified trip risk log, it helps with planning and preparing for potential risks in the well.
How it looks
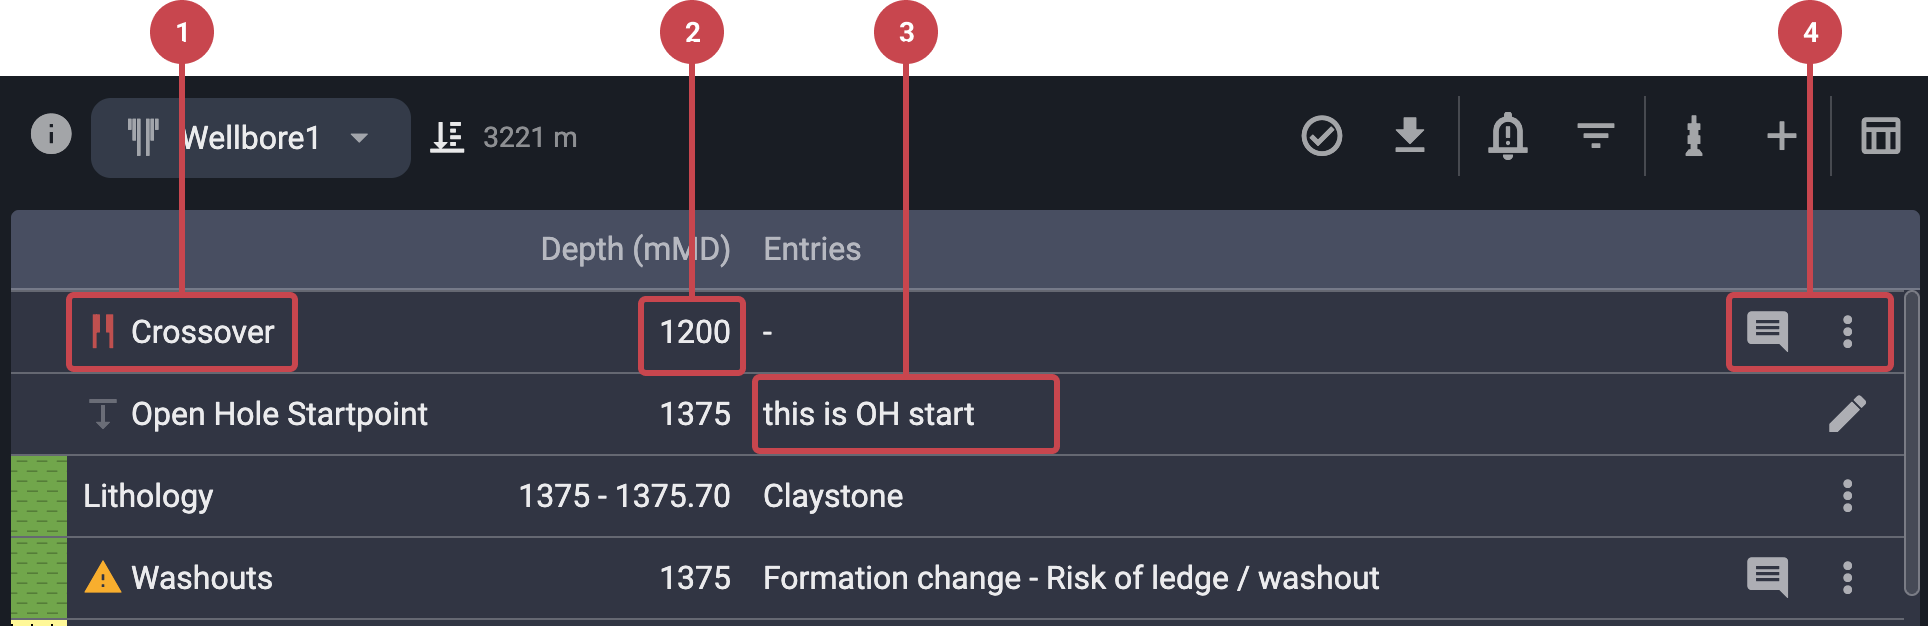
The Table View shows all entries as rows in a structured table. Each row contains details such as:
Title: Describes the type of entry, such as Tight Hole, Hanger, Survey, Formation Top, or Lithology.
Depth (From/To): Indicates the depth range the entry applies to.
Entry Description: Optional additional details explaining the entry.
Comments and Actions: If a comment is attached, a comment icon will appear. Use the More menu icon to add comments, edit, or delete the entry (deletion is only allowed for entries created by the rig team).
Step-by-step instructions
Filter the Table View
Open Table View: Go to WellNav and click the
 Table View icon in the top navigation bar (if you're not already in Table View).
Locate the filter: In the top navigation of the Table View, click the
 Filter list icon.
Select Filter Criteria: Use the toggles to filter by Geology Team Entries, RigFlow Entries, Surveys, and Lithology.
Apply Filters: The table will automatically update to show only the entries that match your selected filters. When filters are active, the top navigation will display a green button with the label Filter active.
Clear Filters: To remove all filters and display every entry again, click the
 remove icon located to the right of the Filter active button.
About the Open hole startpoint
The Open hole startpoint in the table defines the depth where the open hole begins. This setting determines which entry types are visible in the Table View:
Entries that's a part of the category Open hole and entries from the Geological team will only appear if the current bit depth is beyond this point.
Entries that's a part of the category Inside casing are always shown, regardless of current depth.
Use the  Edit icon on the Open hole startpoint row to adjust the depth where the open hole section begins.
This logic helps reduce clutter and ensures the crew only sees entries relevant to the current operation.
Tips and tricks
Always verify the Open hole startpoint to make sure the correct entries are visible.
Use the Table View alongside the Well View to confirm positions visually.
Add missing entries during planning to avoid surprises during execution.