Sensor Snapshot
Sensor Snapshot is a built-in feature that lets you capture sensor values at specific points in time, without filling up the comment field with long strings of text. Instead of turning sensor selections into comment clutter, snapshots are stored in a clean table that gives better visibility, easier reporting, and an improved overview across steps.
The feature works on all steps, including actions. Users typically rely on it during drilling, casing, circulation, and any operation where monitoring values is important. All snapshots can be selectively added to the Operation Log and included in exported reports.
How it looks
Where to find the sensor snapshot

From plan level: Open the Sensor Snapshot overview to see all snapshots collected across the entire plan.
From any step: Click the
 Sensor Snapshot button to view or add snapshots.
Active step: The button opens the sensor list, where you select a sensor or group to add a new snapshot.
Historical step: The button opens the snapshot modal directly, allowing you to review previously added snapshots.
Inside the comment field, using #: Typing # opens the sensor list. Selecting a sensor creates a snapshot, with or without adding a comment, depending on whether text was typed before the #.
How the Sensor Snapshot modal looks
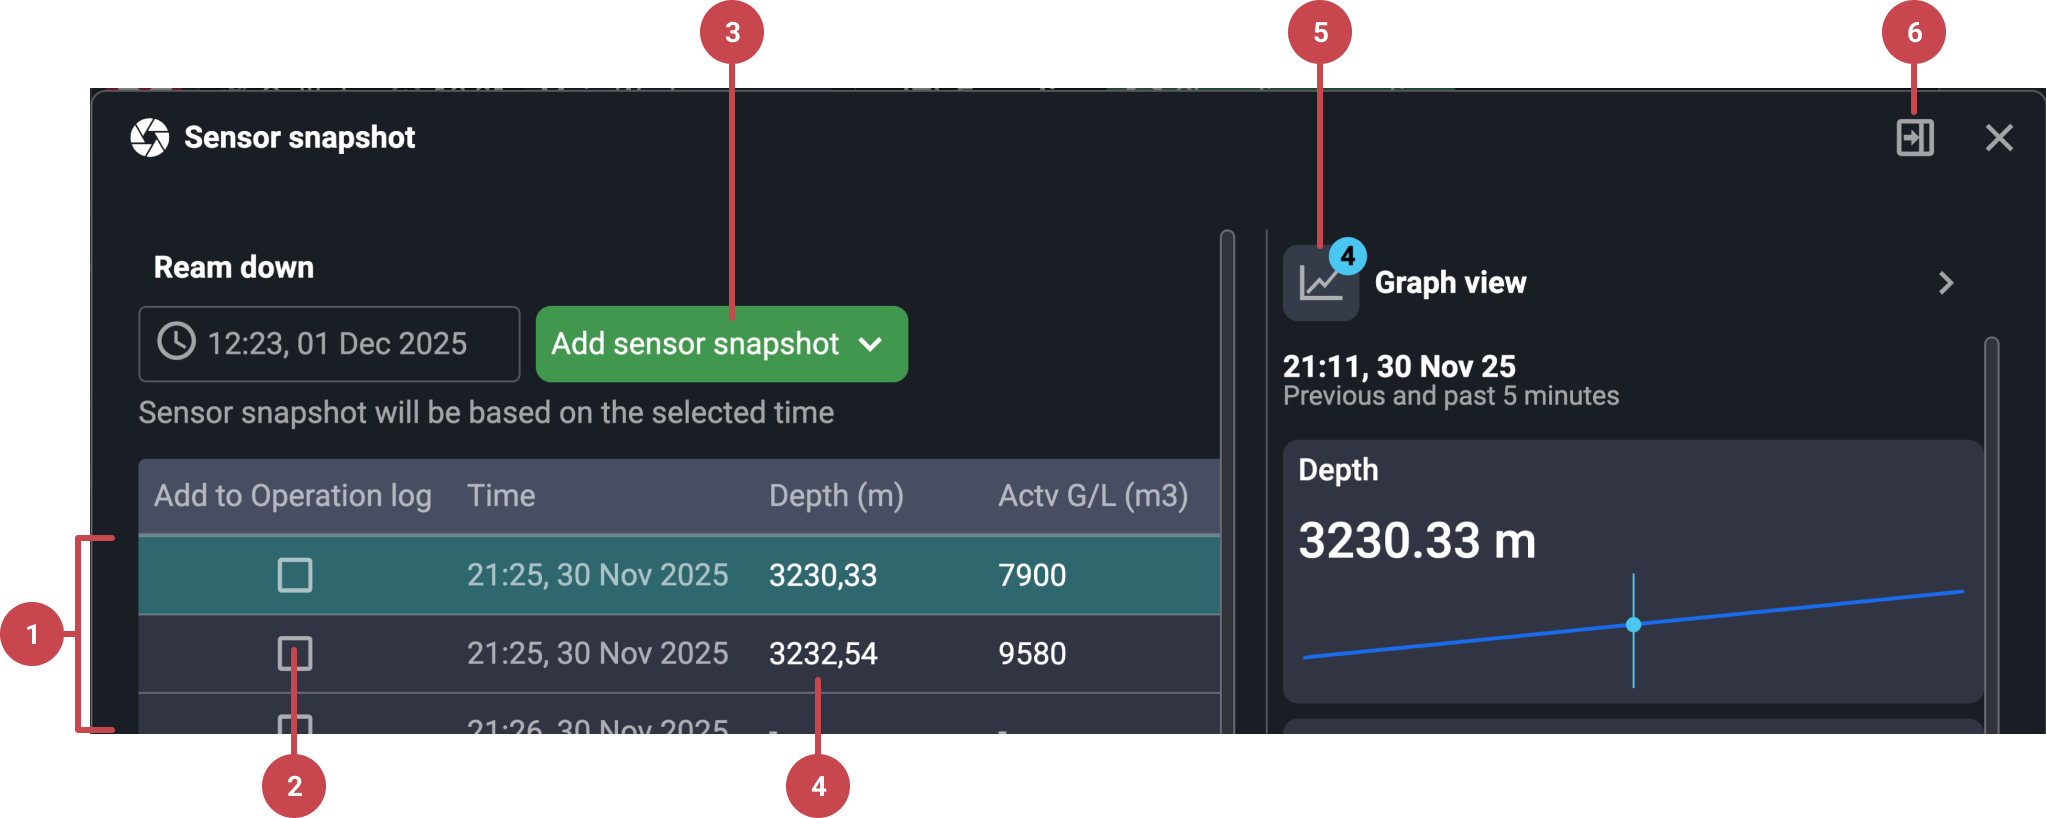
View all snapshots for the current step: The modal displays a table of all captured snapshots, including sensor names and values.
Add snapshots to the Operation Log: Each snapshot has a checkbox allowing you to send it to the Operation Log. Toggling it again removes it. Only snapshots added to the log show up in exports.
Add new snapshots from the modal: On active steps, you can select additional sensors or groups directly from inside the modal.
Edit snapshot values: As long as the step is not locked, you can click into a value and change it.
Open graph view: Selecting a snapshot reveals a graph showing sensor trends 5 minutes before and after the snapshot moment, helping you check stability, spikes, or unexpected behavior.
Dock the snapshot panel: You can dock the modal, using the
 Dock icon, so it stays open in a side panel. New snapshots automatically appear there while you continue working in the step.
Note
Under the Operation Log, and inside the log’s detail view, Sensor Snapshots appear in their own section, separate from comments.
Step-by-step instructions
Adding sensor snapshots
Use the hashtag (#) in the comment field: Type # to open the sensor list. Choose a sensor or sensor group. A snapshot is created immediately.
Choose comment behavior: If # is used as the first character, only a snapshot is created. If you already typed text before using #, both the comment and the snapshot are added.
Use the Sensor Snapshot button: Click the
sensor snapshot button at the top of the step's action bar to select sensors or open the snapshot list (depending on whether you've added any).
Note
Sensor groups e.g. Drilling, Circulate, Tripping and Intervention have predefined default sensor tags. If you want to create a custom group you may do so by defining it in the Realtime data app. Link to the Custom mode or empty panel you can find more information on Realtime data.
Adding a historical sensor snapshot
Choose a snapshot that falls inside the relevant time period for the step.
Open the modal: Click the
sensor snapshot button. Then click on the View all snapshots button. On historical steps, it opens directly.Click the date field (time/date or Now) to set it: In the modal, a field appears with a timestamp or the text Now. It shows next to the Add sensor snapshot dropdown. Click it to change the reference date and time.
Select the desired time: Choose the specific timestamp you want to use, including any past moment when the step was running. Confirm your selected time by saving the change.
Click the Add Sensor Snapshot button: Add a snapshot from your list to the Sensor snapshot table.
Historical snapshot added: Your selected historical snapshot is now successfully included.
Reviewing and editing snapshots
Open the modal: Click the
sensor snapshot button. Then click on the View all snapshots button. On historical steps, it opens directly.Adjust values: Edit values directly by clicking on the value (available only when the step is not locked).
Check trend graphs: Click on a snapshot to view the 5-minute-before-and-after graph.
Dock the modal: Keep the table visible as a side panel while working, by clicking the
Dock button.
Add snapshots to the Operation Log
Open the modal: Click the
sensor snapshot button. Then click on the View all snapshots button. On historical steps, it opens directly.Choose snapshots to include: Toggle the checkbox, Add to operation log on the snapshots you want reported.
See them in the detail view: Snapshots appear as their own category inside the Operation log's detail view, and are not mixed with comments.
Export behavior: Only snapshots added to the Operation log are exported or included when you import data into RigPulse.
Delete a snapshot
Open the modal: Click the
sensor snapshot button. Then click on the View all snapshots button. On historical steps, it opens directly.Choose snapshot to remove: Locate the snapshot you want to delete in the list. Make sure the step is not locked, as it can only be removed when it is open for editing.
Open the delete option: If the table is large, scroll sideways until you see the
 More icon on the snapshot row. Click the More icon and select
  Delete snapshot.
Snapshot is deleted: The snapshot is removed immediately. If it was added to the Operation Log, it is removed from there as well.
Tips and tricks
Selecting, e.g., Fill Pipe through # adds a snapshot without adding text when used at the beginning of the comment.
Adding a comment first, then using #, adds both the comment and the snapshot.
Docking the panel allows continuous monitoring while drilling and capturing multiple snapshots without losing sight of previous values.
Dock snapshots to keep them visible while working through long steps.
Use manual editing to correct values when the system captured a momentary spike.
Once a step is locked, snapshots cannot be added or edited.